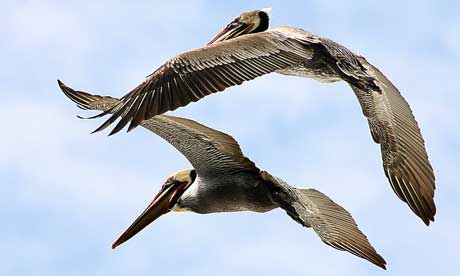
Birds come in a dizzying array of colours, shapes and sizes: perfect photography subjects
Photographing birds presents a number of unique challenges compared with snapping animals: your subject is often smaller, moves faster and is able to fly, not just run away!
You’ll need to get relatively close in order to take bird pictures, so there is no substitute for knowledge of your subject. Often birds will be too nervous to be successfully approached, so your best bet might be to stake out a point and wait for them to arrive – pick the wrong spot and you’ll be unlikely to see anything! Some bird photographers use a portable hide, but this isn’t practical when travelling. Sometimes just finding a quiet spot and keeping still will be enough, especially if you’re near a nesting site or feeding ground.
If you are stalking a bird, try not to stand out on a horizon – birds are good at spotting outlines. If you can’t blend in with the background and have to approach over open ground, keep low to minimise your silhouette. Also, move slowly, but keep your camera ready to shoot in case the bird takes off, presenting a good opportunity for catching them in flight.
Water birds are often less skittish; also, because they often need a long run-up to take off, they provide good photo opportunities even if they do start to fly away.
With most styles of photography you can take good pictures irrespective of your equipment; however, because birds are often small and difficult to approach, you will generally need to invest in a powerful telephoto lens to ensure your avian subjects fill each photo’s frame.
One of the advantages of using a digital SLR (DSLR) is that the size of sensors in most DSLRs effectively add around 50% to the focal length of a lens (though some more expensive DSLRs have sensors that mimic the crop of 35mm film). This means that a 300mm lens will have the same crop as a 450mm lens, so the subject occupies 50% more of the frame.
It is also possible to use a converter that will multiply the focal length of a lens. A 1.5x converter will add 50% to the focal length; a 2x converter will double the focal length. The downside is that you will lose one and two stops of light respectively, so you’ll need to adjust aperture and/or exposure accordingly.
In essence, a 300mm f4 lens with a 2x converter becomes a 600mm f8 lens. With most DSLRs this will have the same crop as a 900mm lens, giving you a powerful lens.
There are some technical aspects to consider when using a super-telephoto lens. First, it can be hard to keep the camera still: the lens doesn’t just magnify the image – it also magnifies any camera shake. A good rule is to use a shutter speed faster than the effective focal length of the lens. So, using the example of a 900mm lens, you should be able to shoot the camera with a shutter speed of 1/1,000 of a second or faster without a tripod. If there is not enough light to achieve this, consider increasing the sensitivity (ISO) setting.
A fast shutter speed will also help to freeze any action, such as a bird taking off, in flight or hunting.
Some lenses have inbuilt vibration reduction (VR) or image stabilisation (IS), allowing you to hand-hold and shoot at a speed three or four stops slower – so for the 900mm lens, instead of setting exposure at 1/1,000 of a second, you could use 1/125 or even slower.
Many photographers use a monopod (a one-legged tripod); these offer stability but also allow more movement than a tripod – you can swivel and follow your subject.
You will usually find that autofocus works best for moving subjects; however, when using a powerful lens the depth of field is very shallow, so it is vital to get the focus spot on. Most DSLRs have a range of autofocus modes; you should experiment to find which ones are best for given subjects and scenarios. Typical options include predictive focus, to accurately focus on moving subjects, and modes to focus on the closest or furthest objects. Closest focus mode is useful if you’re photographing a bird in front of a busy background. Furthest object focus is useful if there are branches or twigs in front of the bird, but just sky behind.
Be realistic about what you can hope to achieve, especially if you don’t have serious equipment or a lot of time to wait around. Larger birds will be easier to photograph; alternatively, try to photograph large flocks or nesting colonies, so you don’t have to get in so close for an interesting, frame-filling shot.
Even if you are photographing a mass of birds, try to look for an individual or small group as a point of focus to create your composition – otherwise you run the risk of just having a random jumble of birds without anything to lead the eye into the picture.
It’s important to be aware that some birds and their nests are protected; it is illegal to approach these birds without a permit. Restrictions, and enforcement, will vary around the world, and you should do your research in advance. You should also be aware of other restrictions in some countries: if you get busted crawling through bushes overlooking an airport, while dressed in camouflage gear and carrying a telephoto lens, your trip may last a little longer than you expected...
The UK has some incredible birdlife, so you don’t have to travel far to practise your skills. Even in central London there are parks where herons nest and fish. If you do take some good shots remember to enter them into the Wildlife category of the Wanderlust Travel Photo of the Year competition – a feathered winner is overdue!